Hiking Guidelines
Know your pace
In an effort to assist members to assess their hiking ability for moderate and semi-moderate hikes, the Club has developed a self-assessment course on “PC Hill”. This is the hill that has the letters “PC” on the side of the hill facing Route 224. You can access the “PC Hill” trailhead off of Route 248. There is a dirt road going behind the Park City School District building. This road is on the left if you are traveling from Park City and is directly across the street from Wyatt Erp Way.
The trailhead is well marked and if you follow the well-traveled path taking the right forks on the way up you will be on the Club’s “Know Your Pace” trail.
About half way up you will come to a four way crossing with a metal stake that is green with a white top and there is a gate on your right. Continue straight until you reach the top, (do not go along the fence).
This is a distance about .9 miles (4724 feet) with an elevation gain of 450 feet. Be sure to go back the same way as you hiked up as there is a sign at the top with an arrow pointing to a trail, which would take you down the other side of the hill.
PCMSC urges all members to do this self-assessment, so you will have a better idea of what to expect on a Club hike, but you still need to be sure you have the stamina to go the distance and time that is listed in the hike description.
The most common Club hike levels are as follows:
Strenuous hike: Average pace 2.1 to 2.8 mph
Moderate hike: Average pace about 2 mph
Semi-moderate hike: Average pace about 1.5 mph
Easy hike: Average pace less than 1.5 mph
Moderate hikers, making only one stop
| Semi-moderate hikers, no more than two stops
|
If your moving time is over 27 minutes you will probably struggle with the moderate hikes. You must be able to keep this pace for an extended period of time of 2 to 3 hours depending on the length of the hike. If you moving time is over 38 minutes, you will probably struggle with the semi-moderate hikes. You must be able to keep this pace for an extended period of time of 1.5 to 3 hours depending on the length of the hike.
Moderate hike leaders guidelines Preparation and Planning
Day of the Hike – Meeting place
At the Trailhead
After the Hike
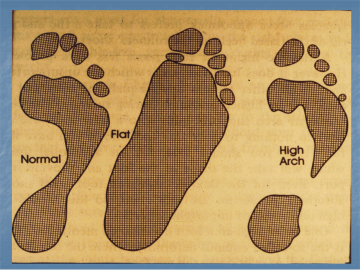
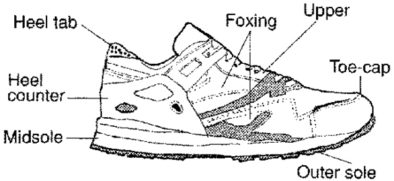
Hiking Poles The use of hiking poles, also referred to as trekking poles, is one of the personal choices for members that are active hikers. However, in order to provide some guidance please read the following article from the “American Hiking Society”: Gear has changed a lot since many of us started hiking. Perhaps one of the most obvious changes, other than the shift toward lightweight equipment, is the growing use of trekking poles among day hikers and long-distance hikers alike. Upon first glance, trekking poles resemble ski poles, sometime leading to awkward questions such as, “Isn’t July a bit early for skiing?” However, trekking poles differ from ski poles in some important ways. Trekking pole handles are often textured, and the poles themselves are rigid and strong, unlike flexible ski poles. Often, their tips are hardened carbide steel, with the ability to “set” into rock and soil to provide traction. Hikers often ask how two trekking poles are better than one “regular” walking stick. The simplest answer to this question is that poles give symmetrical support that one stick does not. Hiking with trekking poles provides many distinct benefits, including: Protecting knees: When walking downhill, poles allow the muscles of the upper body to “take over” some of the cushioning tasks often assumed by the quadriceps and smaller, discrete muscles that support the knee. This means that hikers using two trekking poles experience less knee pain—especially during descents, but also on level terrain. Easing ascents: Poles also allow the muscles of the upper body to “help out” the legs during ascents. Walking up a steep hill, hikers with poles immediately notice that the ability to push off with poles gives them a distinct advantage. Poles can also correct posture during ascent, keeping your head elevated and your lungs fully expanded. Increased stability: The occasional stumble is part of any hike. Poles provide two additional points of contact with the ground and enhance stability. Poles also allow hikers to brace themselves on their poles to remain steady and upright, instead of falling after a stumble. These benefits are of interest to all hikers, but are of particular interest to older hikers, among whom knee pain is a common complaint. True hiking poles are adjustable and the length can be changed for tilted trails (one side made longer), up hills (both made shorter) and down hills (both made longer). Last year’s old ski poles can’t do that. Another issue to consider when using poles is the appropriate use of the pole wrist straps. Those straps do more than allow the poles to be hung neatly when not in use. If they are pulled snugly under the wrists, they will allow the forearms to carry some of body weight. This will prevent the hands from having to grip tightly all the time. Poles that fold sufficiently to be carried in a backpack are recommended so that you can safely stow them if you have to rock scramble. Finally, a word of safety to pole users for those around you. Please be alert to how poles might swing and interfere with other hikers. Hiking Shoes When your feet hurt, you hurt all over.” That old phrase is never more true than when we’re in pain 10 miles up in the wilderness. So how do we prevent this catastrophe from happening? First let’s talk about foot types. Grandma could have given you one of three foot types: • 1) A low arch, loose, flat foot How do you know which type you have? Take a look at Fig. 1. This schematic is similar to what a footprint might look like stepping out of a shower or onto the beach. Fig. 1. Outline of the three basic foot types Each foot type functions better in a different shoe type. Basically there is a simple rule. A stiff (high arched) foot does better in a softer shoe. And a flat, looser (low arched) foot does better in a stiffer, more supportive shoe. Forget the word “good.” Almost all shoe companies make all type of shoes. Very often we are told that “this is a good shoe.” Translation: this is a stiff, expensive shoe. That’s often a meaningless phrase. The shoe must be appropriate for your foot type and the your activity level. If you hike with a 60 pound pack for 10 hours a day then, yes, you probably need a stiff, expensive shoe. But if you do recreational hiking for four or so hours and only carry a 5-10 pound pack, then pay more attention to your foot type than the load-carrying capacity of the shoe. What shoe features do we need to know? See Fig. 2. A stiff shoe (best for a person with a low arched, loose foot) has a stiff heel counter (the part that wraps around the back of the heel) and stiff shank (the part that is under the arch-not labeled in this drawing). A soft shoe (best for a person with a rigid high arched foot has a softer counter and a more flexible shank.
Fig. 2. Parts of a shoe All shoes must have ample toe room. The front of the shoe is the toe box or toe cap. For most people the second toe, the one next to big toe, is the longest toe. Be sure there is about one finger width space between the end of the longest toe and the end of toe box. When to buy shoes: Always try on shoes in the afternoon or evening. Use the socks you will use for hiking. Everyone’s feet swell a little in the afternoon, so sizing a shoe that time of day is best. Walk around in the store for at least five minutes to see if the shoes are comfortable. Never expect the shoe to “break in.” Feet break before shoes. Fabrics for socks: Use socks made of wool, polyester (DuPont “Coolmax” is the best polyester), or a blend of these fabrics with perhaps a small percent of Lycra (elastic). These fabrics will not hold onto moisture. Cotton socks absorb moisture, holds on to the wetness and becomes soggy. Acrylic socks are like plastic bags. Both cotton and acrylic are BAD. The right shoes and socks make for happy hikers. If you go to a shoe store, and the salesperson doesn’t know the facts mentioned above, don’t stay. If the person knows, give him or a her a kiss. See ya out there! |